Knife Skills 101: How to Chop, Dice and Mince Safely
A few reliable knife habits make everyday prep safer and more even. Learn which knives to keep on hand, how to guide the blade, and how to care for it.
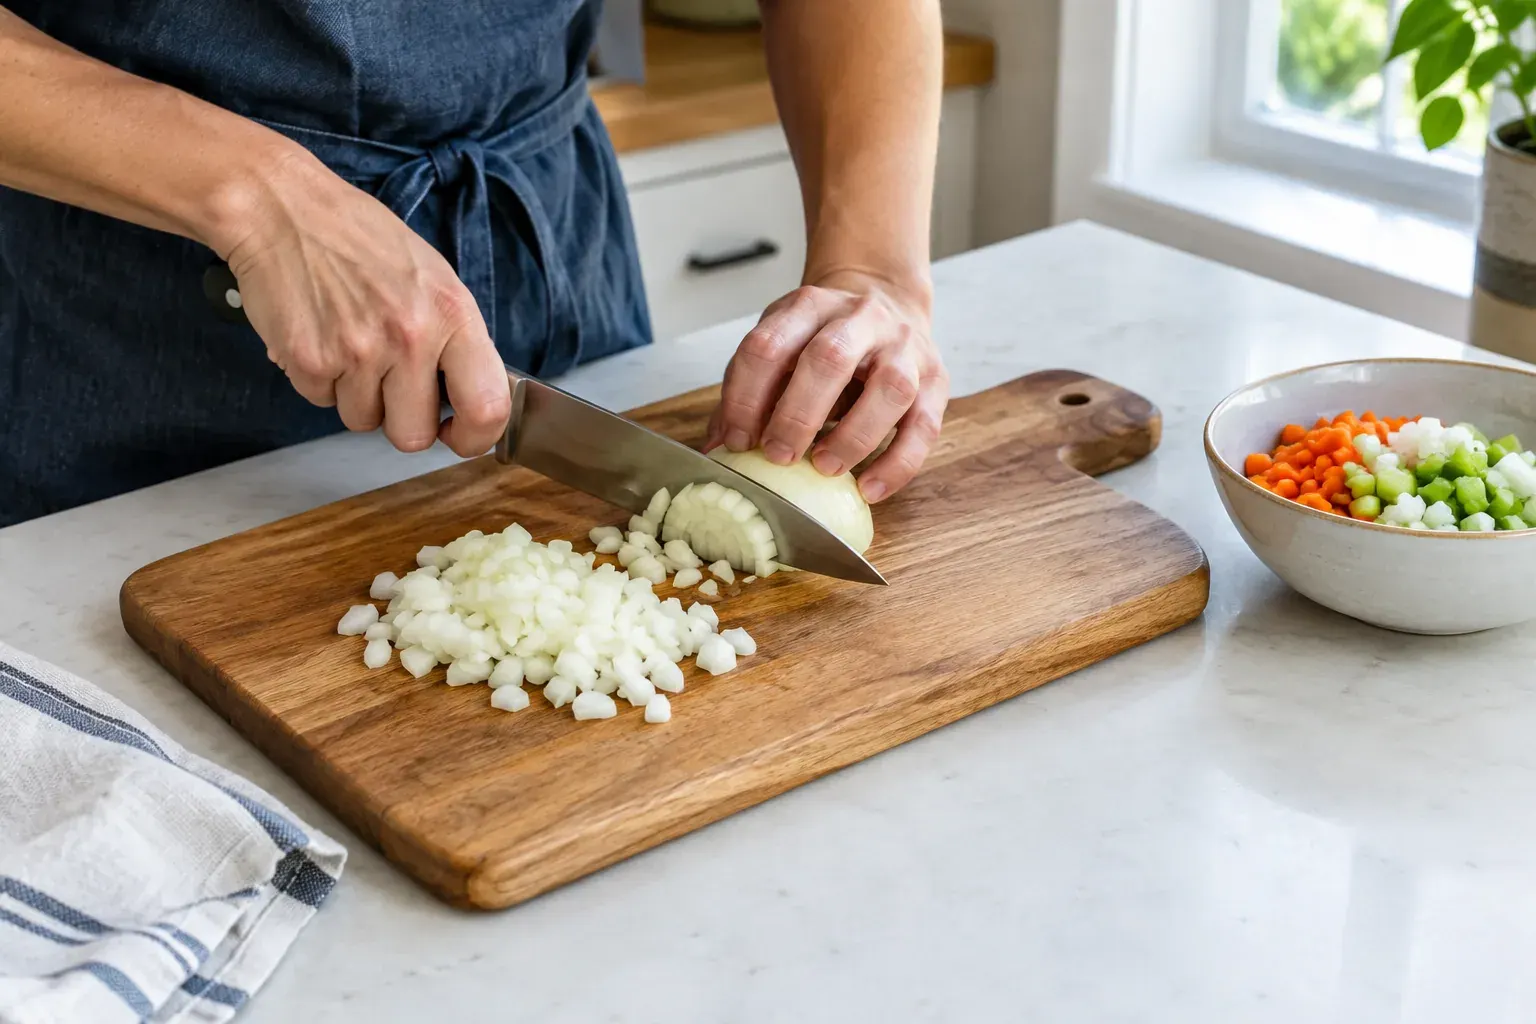
Key takeaways
- A chef’s knife, paring knife and serrated knife cover most home kitchen tasks.
- Stabilize the board, keep the blade sharp, and curl your guiding fingertips into a claw.
- Use a flat side to steady round ingredients before cutting them into smaller pieces.
- For an onion dice, keep the root end intact as you make lengthwise cuts, then slice across.
- Wash and dry knives by hand, then store them with the edge protected.
In this guide
A sharp knife can make meal prep quicker and more controlled, but safe technique matters more than speed. If you are unsure how to hold the knife, keep the board from slipping, or make consistent cuts, start with a few simple habits and practice slowly.
This guide covers the three knives that handle most home cooking, a secure grip, the claw technique, and practical steps for chopping, dicing, mincing and julienning. You will also learn how to maintain a blade and avoid common mistakes that can lead to slips or uneven results.
The three knives most home cooks need
You do not need a large knife set to prepare everyday meals. A chef’s knife, a paring knife and a serrated knife handle most cutting tasks. Choose knives that feel balanced and secure in your hand, and keep each one in good condition.
| Knife | Best for | What to look for |
|---|---|---|
| Chef’s knife | Chopping vegetables, dicing onions, mincing herbs and general prep | A blade around 8 inches is versatile for many home cooks. Choose a handle you can grip comfortably. |
| Paring knife | Peeling, trimming and small, precise cuts | A short blade, often about 3 to 4 inches, that feels easy to control. |
| Serrated knife | Slicing bread and soft-skinned foods with tender interiors, such as ripe tomatoes | Teeth that cut with a gentle sawing motion instead of pressing down. |
A chef’s knife is the workhorse, but it should not be used for every job. Use the paring knife for small items where a large blade would feel awkward. A serrated knife is useful when a smooth blade tends to squash a crust or soft exterior.
Good to know: A knife that fits your hand and feels manageable is more useful than a large, expensive set. If you are choosing your first chef’s knife, test how the handle feels and whether you can control the blade without gripping tightly.
Set up a stable cutting station
A steady board and a clear work area give you more control. Put the cutting board on a dry, flat counter. If it slides, place a damp, wrung-out kitchen towel or nonslip mat underneath it. The towel should be flat, not bunched up.
Before cutting, clear away clutter and move ingredients you are not using out of the way. Keep the knife within the board’s working area, with the blade pointed away from you when you set it down. If you need to turn or move the board, put the knife down first.
Wash produce and dry slippery ingredients when practical. Remove packaging, twist ties and other obstacles before you start. For round vegetables, cut a small slice from one side to create a stable, flat surface, then place that surface against the board.
Keep the board large enough for the ingredient and the knife. A crowded board makes it harder to control food and can encourage you to hold ingredients close to the blade. Use a separate board for raw meat and ready-to-eat foods, and clean the board and work area after handling raw ingredients.
For a broader kitchen reset, see How to Deep Clean Your Kitchen. Keep the immediate cutting area clear even if the rest of the kitchen is still in use.
Hold the knife and use the claw grip
A controlled grip lets your hand guide the blade without placing fingertips in its path. Hold the handle firmly but not rigidly. Many cooks use a pinch grip: place your thumb on one side of the blade near the handle and your index finger on the other side, then wrap the remaining fingers around the handle. If this feels uncomfortable, use a secure handle grip and focus on keeping the knife steady.
Your other hand steadies the food and guides the cut. Curl the fingertips inward so the nails and knuckles face the blade. Keep the thumb tucked behind the fingers. The side of the blade should move alongside your knuckles, which act as a guide, while the fingertips stay back from the edge. This is often called the claw grip.
Start with the knife tip or heel on the board, depending on the cut, and use a controlled motion. For many vegetables, a gentle rocking action works: keep part of the blade in contact with the board as you raise and lower the handle. Avoid lifting the knife high or trying to cut too quickly. Let the edge do the work rather than forcing it through food.
If an ingredient shifts, stop and reposition it. Do not try to catch a piece as it rolls away or reach across a moving blade. When food becomes too small to hold comfortably, set it aside or use a different safe method rather than chasing the last small piece with your fingertips near the edge.
Safety note: Never try to catch a falling knife. Step back and let it fall, then pick it up by the handle once it is still. A falling blade can cause a serious cut.
Chop, dice, mince and julienne
These terms describe different sizes and shapes, but the basic safety rules stay the same: make a stable surface, use the claw grip, and cut at a pace you can control. Uniform pieces cook more evenly, though consistency matters more than achieving a perfect restaurant-style shape.
Chopping
Chopping creates rough, bite-size pieces. Trim or halve the ingredient as needed so it sits steadily on the board. Hold the knife with your dominant hand and use the claw grip to steady the food. Make repeated, controlled cuts, keeping the blade close to the board and your guiding hand behind the edge.
For leafy vegetables or herbs, gather a manageable pile and cut across it. Do not pile the ingredients so high that they shift. If the pieces need to be smaller, gather them into a stable mound with the flat of the blade, then make another series of cuts. Keep your free hand on the food only when it is safely behind the cutting line.
Dicing an onion
A simple small dice begins with an onion cut in half through the root. Peel the halves, then place one half cut-side down so it cannot roll. Leave the root end attached because it helps hold the layers together as you cut.
- With the claw grip, make several lengthwise cuts from the cut end toward the root. Stop short of cutting through the root. Space the cuts according to the size of dice you want.
- Turn the onion half so the root is at the side of your cutting hand, and keep your fingertips curled.
- Make crosswise cuts from the cut end toward the root. The onion will separate into pieces as you work.
- When the remaining piece becomes awkward to steady, stop and reposition it or set it aside. Do not cut toward your fingertips to use up every scrap.
Some cooks make one or more horizontal cuts through an onion half before slicing across it. This can create a very even dice, but it also puts the hand closer to the blade. It is optional. Beginners can get a useful, even dice with lengthwise and crosswise cuts alone.
Mincing garlic and herbs
Mincing means cutting an ingredient into very small pieces. To mince garlic, separate a clove and remove the papery skin. Place the flat side of the chef’s knife over the clove and press carefully with the heel of your hand, keeping your fingers clear of the edge. If you are not comfortable with that step, peel the clove with your fingers or use a garlic press.
Cut the garlic into thin slices, keeping the claw grip, then gather the slices into a small pile and cut across them. Continue until the pieces are as small as the recipe calls for. Avoid sweeping loose pieces toward the blade with your fingertips. Use the flat side of the knife or a scraper to gather them instead.
For herbs, remove any tough stems the recipe does not call for and make a small, stable pile of leaves. For broad leaves, stack a few, roll them loosely, and slice across the roll with controlled strokes. This makes thin ribbons. Turn the ribbons and cut across them if you need a finer mince. Work in small batches so the leaves do not slide around.
Julienne vegetables
Julienne means cutting vegetables into thin matchsticks. Trim the vegetable and cut it into sections of manageable length. For a round vegetable, first make a flat side so it stays put. Cut the sections into thin, even slices, stack a few slices at a time, and cut the stack into narrow strips.
Keep the stack low enough that it does not slide, and use the claw grip to guide the blade. For firm vegetables such as carrots, smaller sections are easier to control than a long, rounded piece. If the strips are for a recipe, follow its suggested size; there is no need to measure each one unless uniform cooking or presentation requires it.
Pro tip: When preparing several ingredients, cut the firmest items first and move finished pieces to a bowl. This keeps the board less crowded and gives you a stable surface for the next ingredient.
Keep the blade sharp: honing and sharpening
Honing and sharpening are related but different. Honing helps realign the blade’s edge between sharpenings. Sharpening removes a small amount of metal to create a new edge. A honing rod does not repair a noticeably dull or damaged knife.
A sharp knife generally cuts with less pressure than a dull one, which can make it easier to control. It is still a sharp object, so use the same careful grip and board setup. If a knife slips, feels blunt, or crushes food instead of cutting cleanly, stop using it for detailed prep until it has been sharpened.
How often a knife needs attention depends on how often you use it, what you cut, and the blade and cutting surface. Follow the knife maker’s directions for honing and sharpening. If using a honing rod, secure it and make controlled strokes, keeping your hands clear of the edge. If you are unsure about the correct angle or method, use a qualified knife-sharpening service rather than experimenting on the blade.
Hard surfaces can dull or damage a knife more quickly. Use a wood or food-safe plastic cutting board, not glass, stone, ceramic or metal. Avoid using a kitchen knife to cut through bones, frozen food or other materials unless the knife is specifically designed for that purpose.
Wash, dry and store knives safely
Wash knives by hand soon after use with warm water, dish soap and a sponge or dishcloth. Keep the blade pointed away from your hand as you clean it, and do not leave a knife hidden in a sink full of water. Rinse and dry it promptly, including the handle and the area near the handle where moisture can collect.
Dishwashers can expose knives to high heat, moisture and contact with other items, which may damage the edge or handle. Hand washing is the safer choice for preserving a knife. Never leave a knife loose in a drawer where someone can reach in and touch the blade.
Store knives in a block, on a magnetic strip mounted securely out of children’s reach, in a drawer insert, or with a blade guard. Make sure the edge cannot rub against other utensils. If you have children at home, choose storage that they cannot access and put knives away immediately after washing and drying.
For meal prep ideas that put these skills to use, see Meal Prep for Beginners. Prep ingredients with clean hands and equipment, then store them promptly and safely.
Common knife-skill mistakes to avoid
- Cutting on a slippery board: Put a damp towel or nonslip mat under the board before you begin.
- Holding food with straight fingertips: Curl the fingers inward and use the knuckles as a guide.
- Using a dull knife and pressing harder: Stop and arrange for sharpening rather than forcing the edge through food.
- Cutting round ingredients without stabilizing them: Create a flat side first and set it against the board.
- Moving too fast: Slow, repeatable cuts are safer and often more even than rushed ones.
- Using the knife to scrape the board: Turn the blade over and use its spine, or use a bench scraper, to move chopped food. This helps protect the edge.
- Leaving a knife in the sink or loose in a drawer: Wash and dry it promptly, then store it with the edge covered or secured.
- Reaching for a falling knife: Move clear and let it fall. Pick it up only after it has stopped moving.
The Bottom Line
A chef’s knife, paring knife and serrated knife are enough for most home cooking. Start with a stable board, a controlled grip and curled fingertips, then practice one cut at a time instead of rushing through prep.
Keep knives sharp, clean and stored safely. If a cutting motion feels awkward or an ingredient will not stay still, pause and reset the board or the food before continuing.
Frequently asked questions
What three knives should a home cook have?
A chef’s knife handles most chopping and dicing, a paring knife is useful for small, precise tasks, and a serrated knife cuts bread and some soft-skinned foods cleanly. Choose knives that feel comfortable and controlled in your hand.
How do you hold a knife safely?
Hold the handle securely, or use a pinch grip with your thumb and index finger near the blade’s base. Curl the fingertips of your other hand inward and use your knuckles to guide the side of the blade.
How do you dice an onion without cutting through the root?
Halve the onion through the root, peel it, and place one half cut-side down. Make lengthwise cuts toward the root without cutting through it, then slice across the onion to form pieces.
Is honing the same as sharpening a knife?
No. Honing helps realign the edge, while sharpening removes a small amount of metal to restore a cutting edge. Follow the knife maker’s instructions, and seek a qualified sharpening service if you are unsure how to sharpen your knife.
Can kitchen knives go in the dishwasher?
Hand washing is the safer way to protect a knife’s edge and handle. Wash it with soap and water, dry it promptly, and store it where the blade is covered or secured.